Hello, we will learn in this tutorial the “rotate” tool or more commonly called “rotation” tool.
First, before begin the rotation tool itself, we’ll understand how to easily we can rotate our objects by using the move tool. On groups and components, when we use our move tool, we have new options that appear on our object (these are ticks). We can observe, while using our move tool we have red tick marks that appear on each face when we fly over them. These crosses will allow us to rotate our object according to the selection of face.
This way of doing things is very useful for making rotations quite easily on objects, but we will now see the rotation tool that will allow us to have more control over our rotations.
![]() Rotation tool, keyboard shortcut is “Q” is different from other tools because we will have to make at least three clicks to use it. Our first click will be used to define the anchor point of rotation and the plane on which we will rotate. The second click will allow us to define the starting axis of the rotation. Finally the third click allows us to finalise the rotation once it suits us.
Rotation tool, keyboard shortcut is “Q” is different from other tools because we will have to make at least three clicks to use it. Our first click will be used to define the anchor point of rotation and the plane on which we will rotate. The second click will allow us to define the starting axis of the rotation. Finally the third click allows us to finalise the rotation once it suits us.
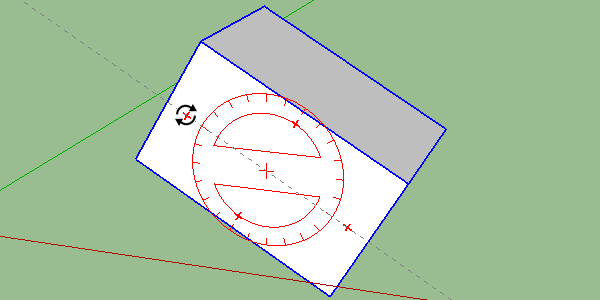
The most important part is going to be our first click. Indeed it defines the starting point but also the plane of the rotation. preselect, we will always select what we want to rotate, in order to avoid annoying surprises. When we take “rotate” tool we notice our dial takes a color according to the different planes. If our selected object is perpendicular to the blue axis the dial will become blue, because we will make a rotation along the blue axis.
You will see that initially the choice of the plan is quite complicated, it is necessary to navigate in the space in order to be find perpendicular to the desired axis. We can lock this axis by holding our “shift” key and then we can move to the desired starting point.
Another simpler way exists, it is to go to our starting point and click on it, and to hold the left button of our mouse and move in the direction to choose rotation plane. Then we can choose the required orientation.
Once we have chosen our plane and our starting point we have only to choose the base axis of the rotation and then we will be able to make this rotation. To choose the starting axis, the easiest way is to choose an axis that is related to our anchor point. We can then give the direction of our rotation, choose an angle with our mouse or just type the angle at the keyboard, example “90” for 90 degrees.
This completed the rotate tools in its basic use. In the next tutorial we will learn Erase advanced features.
Please share you comments below.